Troublesome Stones | 5e Puzzles
By J.A. Malcolm
These free 5e puzzles will give your players something unique and interesting to do in your next game session. Feel free to customize these 5e puzzles to suit you and your players' playstyles.
By the way, if you'd like instant access to 1000s of free 5e resources, don't forget to sign up for the DM Lair Newsletter. We'll even send you new stuff every week!
Troublesome Stones
The Wealth of Dragons
Difficulty: easy
This puzzle consists of five dragon statues and five gemstones, each of which must be placed into the correct statue’s jaws to solve the puzzle.
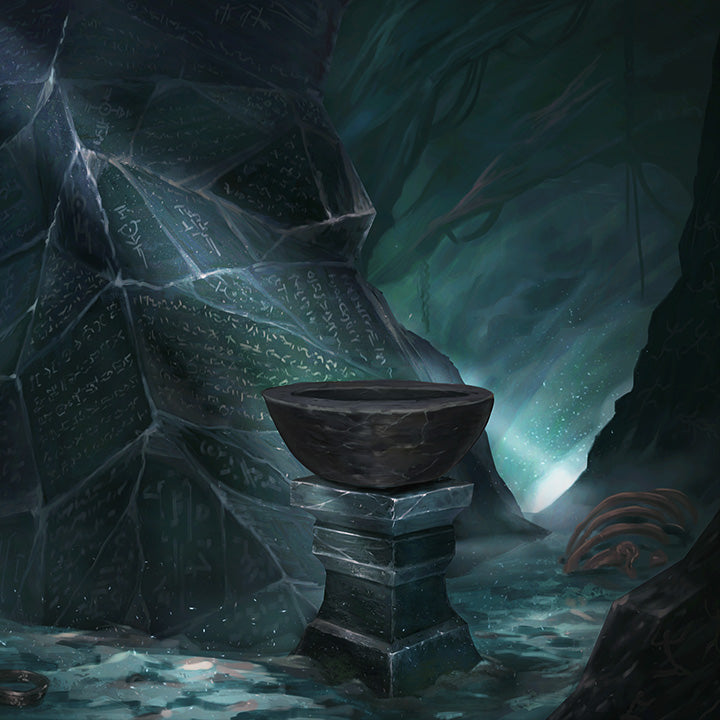
A pedestal rises out of the ground in the center of this circular room. Atop it is a stone basin with five rearing dragon statues perched on its rim. They are each made from different metals: one bronze, one brass, one silver, one gold, and one copper. Inside the basin are two rubies, a diamond, a sapphire, and an emerald.
Puzzle Features
The puzzle is set on a pedestal in the center of a room. On the pedestal is a stone basin that contains two rubies, an emerald, a sapphire, and a diamond. Perched on the basin's rim and spaced equally around it are five metal statues of dragons, each with its mouth open wide enough to hold one gemstone. The statues are made of different metals: brass, bronze, copper, gold, and silver. When a gem is placed in a statue’s jaws, they close enough to hold it in place. If the gem is correct, an audible click is heard, and the gem remains in the statue’s mouth. If the gem is incorrect, the statue spews fire, damaging the character placing the gem for 7 (2d6) fire damage, and the gem is dropped back into the basin. When all the statues are given the correct gems, the puzzle is solved.
Solution
The correct statue-gem pairings are based on the breath weapons of the dragons they model and are as follows:
Brass – Ruby
Bronze – Diamond
Copper – Emerald
Gold – Ruby
Silver – Sapphire
When the puzzle is solved, all five statues breathe fire harmlessly into the basin, and the pedestal rotates, revealing what was hidden beneath. Whether this is a vault or another chamber in the dungeon is up to the game master.
Hint Checks
If the players are having difficulty solving the puzzle, their characters can make checks to receive hints:
Wisdom (Perception) DC 10. Upon closer inspection, the gemstones have small divots in them. These divots match the teeth in the dragon statues, suggesting that they are meant to be placed in the statues’ jaws.
Intelligence (Nature) DC 15. The characters recall that different dragons emit different types of energies as part of their breath weapons.
Customizing the Puzzle
Variants of this puzzle can be created by altering the number of statues or gems presented to the characters. For example, this puzzle can be divided into five straightforward ones by giving the characters four gemstones and a single dragon statue.
Adjusting the Difficulty. The puzzle may be made more difficult by making the solution more complex. This can be accomplished by requiring the gems to be correctly placed in a specific order, requiring that only certain statues be given gems, or rather than simply matching a statue to its breath weapon, matching it to the breath weapon of a neighbor. In any of these cases, additional hints should be provided to indicate that the solution is more complex.
Storied Amulets
Difficulty: medium
This puzzle consists of a stone wheel set in a wall and four amulets that must be inserted into the wheel correctly to solve the puzzle.
At the far side of the room are a large altar and a stone wheel set in the wall. On the altar are four blue, cloudy stones. Each of them glows faintly and thrums with arcane energy. The wheel on the wall is ornately inscribed with religious texts and has a hole in the center that can fit one of the stones.
Puzzle Features
A stone wheel, covered in ornate religious carvings, is mounted on the wall. It is obviously meant to be turned, but any attempt to do so physically will be unsuccessful. Four amulets are laid on an altar in front of the wheel, each emitting a faint glow. If a character touches an amulet, they are given a brief vision as described below.
The first amulet is the Amulet of War. Its vision depicts a horrific battle with massive loss of life and the battlefield itself being shattered. The battle depicted is the Battle of Brothers: a significant event in the world’s mythology where the world’s creators, Kaeli and Konrad, destroyed each other and most of their creation, which ended the Blessed Era and ushered in the world’s current age.
The second amulet is the Amulet of Founding. Its vision depicts the arrival of the gods Kaeli and Konrad in a wasteland, the transformation of the wasteland into a lush and green paradise, the creation of their followers, and the beginning of the first civilization. This is a common version of the world’s creation story.
The third amulet is the Amulet of Unity. Its vision depicts the aftermath of the Battle of Brothers, showing the survivors of the battle banding together, treating the wounded, and beginning the work of recovering and rebuilding their civilization. This is not an event recorded in the world’s historical or religious texts.
The fourth amulet is the Amulet of Power. Its vision depicts an argument between Kaeli and Konrad in a nondescript tavern. While details are hard to make out, it is clear that the two are falling out over who should be considered the major god by their people. While this meeting is a playwright’s interpretation of the gods’ feud and never happened, the world’s religious texts acknowledge that there was a power struggle that caused a rift between the gods.
Each amulet may be picked up safely twice. Subsequent attempts to pick up an amulet will allow the character to see the vision again but deal 10 (3d6) psychic damage to them. The amulets may be picked up safely with a set of tongs near the altar, but this will not show the visions to the character.
The wheel has a hole in the center that a single amulet can fit into, and it must be inserted in the correct order to solve the puzzle. Every correct amulet inserted rotates the wheel by a fifth until a full rotation is achieved and the puzzle is solved. If an incorrect amulet is inserted at any point, it emits a bright flash, and any creature that can see it must make a DC 15 Constitution saving throw, becoming blinded for a minute on a failure. The creature holding the amulet also takes 9 (2d8) psychic damage. Progress on the puzzle is not reset.
Solution
The puzzle is solved when the amulets are inserted in the following order: Amulet of Founding, Amulet of Power, Amulet of War, and Amulet of Unity. When the puzzle is solved, the inscriptions on the wheel will glow, and a hidden door will open on the altar.
Hint Checks
If the players are having difficulty solving the puzzle, their characters can make checks to receive hints:
Intelligence (History) DC 10. The character recognizes the vision granted by the Amulet of War as the Battle of Brothers, which is a climactic moment in the world’s founding story.
Intelligence (Religion) DC 15. The character recognizes the inscriptions as from a minor sect of the world’s religion: The Fatebound. One of their core beliefs is that history is a cycle and events repeat, suggesting that the first and final amulets in the sequence are the same.
Wisdom (Insight) DC 15. The character knows that the setting of the visions from the Amulet of War and the Amulet of Unity is the same, placing them next to each other in the sequence.
Customizing the Puzzle
Game masters are encouraged to use their own world’s creation stories or well-known folk tales as the basis for this puzzle rather than the one suggested here. GMs are also encouraged to mention their world's backstories and lore they are using for this puzzle throughout the dungeon in which the puzzle is used.
Adjusting the Difficulty. The puzzle can be made more dangerous by adding an encounter for the player characters to deal with after a certain amount of time or attempts. The puzzle can also be made more difficult by only communicating the visions to the player whose character touched the amulet, forcing them to relay information to the rest of the party.
Get Access to 1000s of Free 5e Resources!
Sign up for the DM Lair Newsletter to instantly get access to our entire library of free 5e resources. We'll also send you new resources every week!
-
Posted in
Puzzles