The King's Path | Free 5e and PF2e Mini Adventure

Written by Zac Chaney
Cartography by Rye Clarke and Sir Vicke
The following is one of two mini-adventures in the April 2024 issue of Lair Magazine, Fables & Fantasy. It is shorter than a standard adventure, comprising about half an adventuring day. Because it is not a full-length adventure, most adventuring parties one level below the adventure level should be able to complete it. However, since it is not for parties of that level, they may find it more challenging than expected and even face the risk of defeat.
Because this adventure intentionally comprises only a portion of an adventuring day, it does not follow the traditional quest-giver-to-adventure-location structure. Instead, consider one of the following alternative options to start the adventure:
- The characters stumble upon the first part of the adventure while on their travels. This may occur as they travel to another adventure location or while exploring the wilderness. It may also be an alternative to a random encounter.
- The characters hear rumors about the described location and want to check it out. One can use this to either set up a larger scenario in the future or as a welcome distraction from the main campaign.
- A patron or NPC asks the characters to investigate the location, using the short adventure to gauge the characters’ skills. This method can be particularly useful as an “induction” mission with little chance of failure to ensure that the characters survive their first real mission from the patron.
When using any of these, keep in mind the nature of your group. As written, this adventure assumes the characters are good-aligned and will investigate wrongdoing of their own accord. If this does not apply to your group, consider adding incentives as appropriate.
If you're looking for other 5e and PF2e resources, check out our entire collection of Lair Magazine issues.
The King’s Path - 5e
Below are the details you need to run this adventure. However, the game master is encouraged to customize it slightly for their group and ongoing campaign. Consider questions such as the following:
- Where will this adventure take place in your world?
- Should you change any of the location names to make them better fit your campaign setting?
- Should you increase or decrease the loot, including adding or removing magic items?
- Should you adjust any of the encounters to better fit the power level of your players and their characters?
Game Master Notes
Level. This adventure is designed for a group of four to six level-five characters.
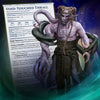
Creatures. This adventure features the following creatures: grick, minotaur skeleton, specter, stone golem.
Resting. It’s expected that the party will not need to take any long rests in this adventure, though they may need a short rest if the characters encounter bad luck.
Loot. This adventure contains treasure from one roll on the Individual Treasure: Challenge 5-10 table in the Game Master’s Core Rulebook and a rod of rulership.
This adventure is best suited to serve as a point of interest the characters find while exploring or as a test from an NPC who follows the old ways. When integrating it into your campaign, consider what details you need to add or change; for example, you may want to change the unnamed ancient kingdom to be an ancient kingdom from your setting—perhaps even create a new one whose way of life had been lost to history until the characters found this small part of it.
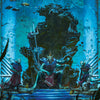
Old Statue
A massive stone statue stands resolute against crashing waves and a steep cliff. The statue has weathered many long years, and the winds and rains it has endured have washed away its finest features; despite the weathering, its kingly appearance is still easily recognizable. A long table surrounded by six chairs stretches out at the statue’s feet, all covered in heavy foliage that has taken root in their cracks and crevices. Two offering bowls—one filled with gold and one with flowers— lie between the table and the statue.
Statue. This statue is of an ancient king from a lost civilization whose name fell from the historic records hundreds or potentially even thousands of years ago. Not even the most well-learned scholars could tell one the name of the man behind the statue, at least not readily. If a character succeeds on a DC 18 Intelligence (History) check, they’ll realize that even if most of the knowledge of that ancient civilization is lost, the after-effects of their presence likely remain. Those after-effects are for the game master to determine as they see fit to suit their campaign’s needs.
The statue is also a stone golem, which will animate in certain conditions (see the encounter notes below). Once the statue animates, its base reveals an underground staircase to a secret area below.
Offering Bowls. The offering bowls appear to be full of gold and flowers, but the contents are nothing more than mere illusions. One can uncover this fact with a DC 15 Intelligence (Investigation) check or by interacting with them. A small inscription at the base of the statue reads:
“Take not the wealth of my kingdom lest you leave the wealth of a kingdom. Take not the wealth of my people lest you leave the wealth of a people. Take only that which is freely given and whose value is worth more than the wealth of the world.”
This inscription is, naturally, a riddle. The answer is wisdom, as one can give it freely, and it is invaluable—particularly to someone like a king who already has everything the world could offer. Once the correct answer is given, typically by asking the statue to share its wisdom, the stone golem animates and gives the characters the king’s trial.
If the characters try to take the coins or the flowers (not just to observe them but with the intention of enriching themselves), they will fail the trial of wisdom; however, they may continue with the other parts of the trial if they choose, assuming they eventually find the correct answer to the riddle.
Roleplaying Notes.
- This portion only begins if the characters successfully cause the stone golem to animate.
- The golem’s creators gave it the ability to speak, but only in a limited capacity. If the characters ask questions beyond those related to the trials of the king’s path, the golem tells them, “I only have access to knowledge relevant to my function and cannot provide that information.”
- It tells the characters that they have completed the first trial on the king’s path, but two trials remain.
- They have already passed the trial of wisdom, showing rare acumen for what is truly valuable in the world and understanding that not all wealth is gold, nor is all food bread.
- The next trial they must overcome is the trial of strength, as a king must be strong enough to lead their people into battle and stand against threats to their kingdom.
- If the characters ask for more information about the trial of strength, the golem explains that they must defeat it in combat. It cautions them, however, to remember that a king should wield mercy whenever possible but mustn’t be afraid to use force when needed.
- The final trial shall be the trial of patience, for a king mustn’t always rush lest he leaves his kingdom behind and finds himself standing alone against the world.
- If the characters ask for more information, the golem tells the characters that the nature of the trial will be revealed when it is time for it to begin.
- Finally, should the characters ask what the purpose of the trials is, the golem responds, “My creators believed that kingship is not a birthright. Only those who prove themselves fit may call themselves king.”
Encounter Notes.
- Once the golem has told the characters about the trials, it tells them that it is time to begin the trial of strength and tells them to raise their weapons.
- The golem rolls initiative twice and uses both results. The higher result is when the golem takes its normal turn. On the lower result, the golem may either move up to its movement speed without provoking attacks of opportunity or use its slam attack once.
- The golem’s first priority when fighting is to use its slow action to limit the characters as much as possible.
- After that, it does its best to stay mobile and pick characters off using its powerful slam attacks.
- When the golem is low on hit points, usually when it reaches 10 or lower unless the characters hit it particularly hard, it surrenders to the characters.
- When it does, the characters must show it mercy and sheathe their weapons; if they continue attacking it, they will fail the trial of strength.
- Otherwise, the golem shows them the path to the underground shrine where the final trial awaits—the trial of patience. It gives one final warning before the characters descend: “Once you reach the shrine, you will either emerge as king candidates, or you may never set foot in the kingdom again.”

Underground Shrine
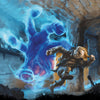
The cavern is damp and musky; nothing has maintained the space in many years, likely even centuries. There are, of course, ample signs of life in the cave. A few plants manage to grow here, and the subtle scraping of a mouse’s claws against stone cuts sharply across the otherwise silent atmosphere. On the far eastern edge of the cavern is a stone and wood structure lit by a pair of lanterns sitting on its steps.
Shrine. As with the bowls at the above statue, the coins in the bowl at this shrine are illusions. The bowl itself is inscribed with the words, “Forget not the lessons of a trial passed.” Should the characters attempt to take the coins from the bowl as profit, they will fail the trial of wisdom even if they have passed it at the statue.
Further back in the shrine, a tablet reads, “A king must know patience; doing nothing is often the best course, even if it is the most challenging. However, a wise king would not mistake patience for an unwillingness to act.” To pass the trial of patience, the characters must take a long rest at the shrine. They cannot use this long rest to accomplish other tasks unless mandated (such as a cleric who is mandated to offer certain prayers every night).
Death. If a character dies in this cavern, they can’t pass on to the afterlife. Instead, they are bound to this cave as a specter cursed to spend eternity haunting this place and putting people through the trial of patience in the future.
While Resting. About one hour into the characters’ long rest, a pair of gricks approaches their camp. Along with the gricks, a pair of minotaur skeletons and four specters rise from the waters surrounding the shrine. These creatures approach the characters, invading their personal space but not immediately attacking.
Roleplaying Notes.
- The gricks are not truly part of the trial, but the trial will not ignore what the characters do to them.
- If the characters do nothing for a while, the gricks will eventually grow disinterested in them and leave. Something about the shrine overrides the gricks’ instinct to attack the characters unless attacked first.
- The specters taunt and jeer at the characters, trying to provoke them. They get close to the characters and even appear like they’re going to strike, though a DC 15 Wisdom (Insight or Perception) check will reveal that they’re not going to hit.
- If the characters strike before the specters actually try to hit them, they will fail the trial.
- Eventually, after the gricks leave, the specters grow tired of provocations and directly attack one of the characters, fully intending to hit them.
Encounter Notes.
- The gricks are here only as passing creatures. The specters and minotaur skeletons do not acknowledge their presence and don’t attack them. If the characters resist the urge to fight back against the specters’ provocations, the gricks will leave before the fighting starts.
- Once the specters attack, the minotaur skeletons join in. At this point in the trial, the characters must fight back, or else they will have failed the second part of the trial.
- After defeating the specters and minotaur skeletons, the characters must finish their rest to complete the last trial.
Conclusion
Once the characters have defeated the specters and minotaur skeletons, they will either be king’s candidates or banished from the kingdom.
King’s Candidates. The characters will be declared king’s candidates if they complete all three trials successfully. Of course, this is not a meaningful title in this day and age, as the kingdom they are candidates to rule fell hundreds of years ago. However, the gold in the offering bowls becomes real and is theirs to take; it amounts to 100 gp. Additionally, a rod of rulership materializes in the shrine to symbolize their status as king’s candidates.
Banished from the Kingdom. This outcome may have been a severe punishment and deterrent hundreds of years ago, but it is virtually meaningless now; the kingdom that would have banished them fell long ago. However, the characters will not receive any rewards for their efforts as they would have if they passed the trials.

The King’s Path - Pathfinder 2e
Below are the details you need to run this adventure. However, the game master is encouraged to customize it slightly for their group and ongoing campaign. Consider questions such as the following:
- Where will this adventure take place in your world?
- Should you change any of the location names to make them better fit your campaign setting?
- Should you increase or decrease the loot, including adding or removing magic items?
- Should you adjust any of the encounters to better fit the power level of your players and their characters?
Game Master Notes
Level. This adventure is designed for a group of four level-five characters.
Creatures. This adventure features the following creatures: grick, skeletal giant, ghost commoner, wood golem.
Adventure Difficulty. The party can expect to encounter one low encounter and one severe encounter in this adventure.
Loot. This adventure contains the following treasure: rod of wonder and an assortment of mundane loot.
This adventure is best suited to serve as a point of interest the characters find while exploring or as a test from an NPC who follows the old ways. When integrating it into your campaign, consider what details you need to add or change; for example, you may want to change the unnamed ancient kingdom to be an ancient kingdom from your setting—perhaps even create a new one whose way of life had been lost to history until the characters found this small part of it.
Old Statue Low 5
A massive stone statue stands resolute against crashing waves and a steep cliff. The statue has weathered many long years, and the winds and rains it has endured have washed away its finest features; despite the weathering, its kingly appearance is still easily recognizable. A long table surrounded by six chairs stretches out at the statue’s feet, all covered in heavy foliage that has taken root in their cracks and crevices. Two offering bowls—one filled with gold and one with flowers— lie between the table and the statue.
Statue. This statue is of an ancient king from a lost civilization whose name fell from the historic records hundreds or potentially even thousands of years ago. Not even the most well-learned scholars could tell one the name of the man behind the statue, at least not readily. If a character succeeds on a DC 25 Society (Expert) check, they’ll realize that even if most of the knowledge of that ancient civilization is lost, the after-effects of their presence likely remain. Those after-effects are for the game master to determine as they see fit to suit their campaign’s needs.
The statue is also a petrified wood golem, which will animate in certain conditions (see the encounter notes below). Once the statue animates, its base reveals an underground staircase to a secret area below.
Offering Bowls. The offering bowls appear to be full of gold and flowers, but the contents are nothing more than mere illusions. One can uncover this fact with a DC 15 Perception check or by interacting with them. A small inscription at the base of the statue reads:
“Take not the wealth of my kingdom lest you leave the wealth of a kingdom. Take not the wealth of my people lest you leave the wealth of a people. Take only that which is freely given and whose value is worth more than the wealth of the world.”
This inscription is, naturally, a riddle. The answer is wisdom, as one can give it freely, and it is invaluable—particularly to someone like a king who already has everything the world could offer. Once the correct answer is given, typically by asking the statue to share its wisdom, the wood golem animates and gives the characters the king’s trial.
If the characters try to take the coins or the flowers (not just to observe them but with the intention of enriching themselves), they will fail the trial of wisdom; however, they may continue with the other parts of the trial if they choose, assuming they eventually find the correct answer to the riddle.
Roleplaying Notes.
- This portion only begins if the characters successfully cause the wood golem to animate.
- The golem’s creators gave it the ability to speak, but only in a limited capacity. If the characters ask questions beyond those related to the trials of the king’s path, the golem tells them, “I only have access to knowledge relevant to my function and cannot provide that information.”
- It tells the characters that they have completed the first trial on the king’s path, but two trials remain.
- They have already passed the trial of wisdom, showing rare acumen for what is truly valuable in the world and understanding that not all wealth is gold, nor is all food bread.
- The next trial they must overcome is the trial of strength, as a king must be strong enough to lead their people into battle and stand against threats to their kingdom.
- If the characters ask for more information about the trial of strength, the golem explains that they must defeat it in combat. It cautions them, however, to remember that a king should wield mercy whenever possible but mustn’t be afraid to use force when needed.
- The final trial shall be the trial of patience, for a king mustn’t always rush lest he leaves his kingdom behind and finds himself standing alone against the world.
- If the characters ask for more information, the golem tells the characters that the nature of the trial will be revealed when it is time for it to begin.
- Finally, should the characters ask what the purpose of the trials is, the golem responds, “My creators believed that kingship is not a birthright. Only those who prove themselves fit may call themselves king.”
Encounter Notes.
- Due to the wood golem long being petrified, it has a +1 status bonus to AC but a 5-foot status penalty to its speed. This status cannot be altered.
- Once the golem has told the characters about the trials, it tells them that it is time to begin the trial of strength and tells them to raise their weapons.
- The golem rolls initiative twice and uses both results. The higher result is when the golem takes its normal turn. On the lower result, the golem has one action it may use.
- The golem’s first priority when fighting is to use its splinter volley. After that, it does its best to stay mobile and pick characters off using its ranged attacks, if possible.
- When the golem is reduced to 0 hit points, it doesn’t die. Instead, it surrenders to the characters. When it does, the characters must show it mercy and sheathe their weapons; if they continue attacking it, the golem perishes, and the characters fail the trial of strength.
- Otherwise, the golem shows them the path to the underground shrine where the final trial awaits—the trial of patience. It gives one final warning before the characters descend: “Once you reach the shrine, you will either emerge as king candidates, or you may never set foot in the kingdom again.”
Underground Shrine Severe 5
The cavern is damp and musky; nothing has maintained the space in many years, likely even centuries. There are, of course, ample signs of life in the cave. A few plants manage to grow here, and the subtle scraping of a mouse’s claws against stone cuts sharply across the otherwise silent atmosphere. On the far eastern edge of the cavern is a stone and wood structure lit by a pair of lanterns sitting on its steps.
Shrine. As with the bowls at the above statue, the coins in the bowl at this shrine are illusions. The bowl itself is inscribed with the words, “Forget not the lessons of a trial passed.” Should the characters attempt to take the coins from the bowl as profit, they will fail the trial of wisdom even if they have passed it at the statue.
Further back in the shrine, a tablet reads, “A king must know patience; doing nothing is often the best course, even if it is the most challenging. However, a wise king would not mistake patience for an unwillingness to act.” To pass the trial of patience, the characters must take a long rest at the shrine. They cannot use this long rest to accomplish other tasks unless mandated (such as a cleric who is mandated to offer certain prayers every night).
Death. If a character dies in this cavern, they can’t pass on to the afterlife. Instead, they are bound to this cave as a ghost commoner cursed to spend eternity haunting this place and putting people through the trial of patience in the future.
While Resting. About one hour into the characters’ long rest, a pair of gricks approaches their camp. Along with the gricks, a skeletal giant and four ghost commoners rise from the waters surrounding the shrine. These creatures approach the characters, invading their personal space but not immediately attacking.
The characters are not intended to fight the gricks. They are intended only to be a passing curiosity in the setting and are not hostile. If the characters choose to fight them, this encounter is an extreme encounter; use your judgment if this happens to determine if any on-the-fly modifications are appropriate, such as having the creatures attack in waves.
Roleplaying Notes.
- The gricks are not truly part of the trial, but the trial will not ignore what the characters do to them.
- If the characters do nothing for a while, the gricks will eventually grow disinterested in them and leave. Something about the shrine overrides the gricks’ instinct to attack the characters unless attacked first.
- The ghost commoners taunt and jeer at the characters, trying to provoke them. They get close to the characters and even appear like they’re going to strike, though a DC 15 Perception check will reveal that they’re not going to hit.
- If the characters strike before the ghost commoners actually try to hit them, they will fail the trial.
- Eventually, after the gricks leave, the ghost commoners grow tired of provocations and directly attack one of the characters, fully intending to hit them.
Encounter Notes.
- The gricks are here only as passing creatures. The ghost commoners and skeletal giant do not acknowledge their presence and don’t attack them. If the characters resist the urge to fight back against the ghost commoners’ provocations, the gricks will leave before the fighting starts.
- Once the ghost commoners attack, the skeletal giant joins in. At this point in the trial, the characters must fight back, or else they will have failed the second part of the trial.
- After defeating the ghost commoners and skeletal giant, the characters must finish their rest to complete the last trial.
Conclusion
Once the characters have defeated the ghost commoners and skeletal giant, they will either be king’s candidates or banished from the kingdom.
King’s Candidates. The characters will be declared king’s candidates if they complete all three trials successfully. Of course, this is not a meaningful title in this day and age, as the kingdom they are candidates to rule fell hundreds of years ago. However, the coin in the offering bowls becomes real and is theirs to take; it amounts to 100 sp. Additionally, a rod of wonder materializes in the shrine to symbolize their status as king’s candidates.
Banished from the Kingdom. This outcome may have been a severe punishment and deterrent hundreds of years ago, but it is virtually meaningless now; the kingdom that would have banished them fell long ago. However, the characters will not receive any rewards for their efforts as they would have if they passed the trials.
Get More 5e and PF2e Resources!
Run awesome games. In less time.
Being a game master is amazing, but it's also a lot of work. Creating the world, the adventures, the NPCs—and sometimes you may not have time for all that.
Sometimes you just need a quick adventure that you can drag-and-drop into your game, prep for in under an hour, and be ready to rock and roll. And that's how Lair Magazine can help.
Every monthly issue of Lair Magazine is packed with GM resources such as adventures, puzzles, traps, encounters, maps, and more. Designed for both 5e and Pathfinder 2e by professional game masters, Lair Magazine adventures feature
- Game master notes
- Vivid read-aloud text
- Roleplaying and encounter notes to guide play
- Detailed area descriptions
- Unique formatting that allows you to find information fast
- Expertly crafted maps
For instance, Fables & Fantasy includes ten magic items, five puzzles, an article about creating your own high-fantasy campaign, two short adventures for levels 5 and 10, and one level 2 and one level 3 adventure with digital maps!
Of course, if you're looking for more bang for your buck, you'll want to pick up Lair Magazine Bundle: Issues 40-42.Then you'll get Fables & Fantasy and two other issues: Desperation & Darkness and Society & Splendor. That's nearly 200 pages of 5e and PF2e GM resources!
Get Access to 1000s of Free 5e Resources!
Now, if you're on a budget, we totally understand. That's why we also offer loads of free 5e resources for folks. Just sign up for the DM Lair Newsletter to instantly get access to our entire library of free 5e resources. We'll also send you new resources every week!
-
Posted in
adventures